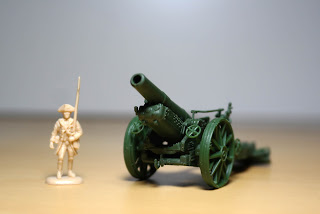
The gun is molded in very soft plastic, so exercise care when removing/handling the thinner parts as they are very prone to breakage.
Nevertheless, it was a fairly simple build, and I spent more time trying to decipher the instructions and searching for reference images than actually putting the model together.
For step 2, I added the ground spade (28E), but many of the pictures that I see of the howitzer don't seem to use it. Most of the time it looks like the trail is set on some kind of rail.
Step 3 has some typos, and parts 32E/33E can probably be installed more easily during this step.
I used the wheels (1F) to help with aligning the brakes (7F), and also recommend not attaching the handwheels (8E) until the howitzer is almost complete.
For step 4, I needed to create a replacement tow hook because part 31E was short shot.
Step 5 only shows one side of the gun, so it's not really clear how or where some of the parts are supposed to fit. It doesn't help that some of the arrows point to puzzling locations. Luckily, Landships has excellent images of how these parts should fit.
Step 6 also has some typos, and some of the parts don't look much like the drawings.
I built 3E/11E/12E/41E with the gun assembly, but allowed the barrel to pivot freely. While the glue was still setting, I aligned everything with the carriage to make sure that the mount fit properly. After the gun mount was aligned, parts 23E/39E were glued on and checked for fit with the carriage.
Next, decide on the how you want to display the howitzer and fix the position of the barrel in the mount with glue. In tow configuration, the end of the gun mount is connected to the gun lock (18E).
In loading position, the barrel is parallel to the carriage. I was originally thinking of building the howitzer with the breech open for loading, but it would have meant filling in the seams on the inside of the barrel, so I changed my mind.
Attach 16E/19E/35E after the barrel is glued in place. These parts were the most difficult for me because I couldn't really find any close up pictures of how they fit together.
I don't see the gun lock in many pictures so I left off part 18E and substituted a metal pin instead, but there are location holes to fit it on the right trail if you want to include it in your build.
I'm guessing that the lock got in the way of the loading tray so it was taken off when the howitzer was used in the field.
For step 7, just glue 40E into the notch in the trail instead of to the gun mount.
There will be a couple of extra pieces left over after the build. I'm not sure what part 15E is, but it looks like a part for Mk I-V howitzers.
Now I just need to attach the treads to the wheels and paint. It should be noted that there has been some controversy regarding the orientation of the tread pattern, but I will follow the mirrored look as shown below.


No comments:
Post a Comment