Tuesday, June 29, 2021

Lava Children

Lava Children are often scorned as one of the absurd joke monsters from the Fiend Folio, and people have laughed at the illustration for bearing a striking resemblance to Alfred E. Neuman, but something about the harness it wore had a vaguely Polynesian look that made the association with lava work for me.


On the other hand, I didn't care for the 5th ed. incarnation of the Lava Child, which looks like the unholy spawn of Carrot Top and Pennywise.


There are no miniatures of Lava Children, and I doubt that there ever will be, so I took it upon myself to make my own version based on the original Russ Nicholson illustration.

I started out by sculpting the face out of Kneadatite.

What– Me worry?

To make things simpler for myself, I decapitated one of the Deep Fire Dwarves from Sgt Major Miniatures (now sold by Battle Valor Games) to use as the basis for a body.

I'm guessing that the miniatures are supposed to be Azers from the Monster Manual II, which are probably even more obscure than Lava Children.


First the head was attached, and some lines were scribed onto the kilt.


Then I sculpted the harness to the best of my ability.


My plan for painting is to undercoat with black, and then use a foam brush to dab gray and white over it to replicate the appearance of a charcoal briquette after being used in a barbeque.


A closely related monster for which there are three miniatures is the Magman (Magmin). The first miniature is from the D&D Miniatures line (Angelfire #56), while the next two miniatures are from the Icons of the Realms line (Elemental Evil #01 and Monster Menagerie 3 #1).


The Angelfire miniature was my original candidate as a proxy for a Lava Child, albeit undersized. The Elemental Evil miniature was rather underwhelming, but I liked the Monster Menagerie miniature so much (because it is made of transparent plastic), that I bought a whole bunch of them.


Another lava related miniature is the Magma Mephit (Monster Menagerie 3 #02a), which has an alternate paint version that is the Mud Mephit (Monster Menagerie 3 #02b).


I really like the look of these miniatures, and if you don't want to use them as mephits, they could just as easily pass for imps or homunculi.


Thursday, June 10, 2021

Sixer

The Alvis FV603 Saracen was designed as a post-war replacement for the AEC armored car. The Saracen was rushed into production in 1952 for use during the Malayan Emergency. In subsequent years it played a similar role in apartheid era South Africa and Northern Ireland.


The Royal Hong Kong Police introduced them to their Police Tactical Unit (PTU) in 1970 after the 1967 Hong Kong Riots (六七暴動), where it was used until 1988 when it was replaced by the Saxon.


The most common diecast models of the Saracen are the venerable Matchbox/Lesney model in 1/86(?) and the Dinky model in 1/60(?) scales.

The Dinky model is of note because a version was produced in the livery from the Mission Highly Improbable episode of the TV show The Avengers.

That's not 1/72!

In the 1/72 world, diecast Saracen models have recently been produced by Tiny City. As a Hong Kong based company, it was obligatory for them to release several PTU versions in addition to a single British Army version.

PTU 5 and PTU 4

PTU 12 and PTU 5

PTU 4 and British Army

British Army and PTU 12

PTU 12 came with some red cross stickers for the turret which I did not use. In addition, it has a flag, but there is no way to mount it on the hull (I just used some Elmers Tac to stick it on the side of the hull for pictures).


I bought a couple of extra British Army versions because I wanted to repaint them in a uniform Deep Bronze Green or NATO Green, but I'm not sure how to disassemble the models since there are no obvious screws or rivets like in typical diecast cars, so the project will have to wait.


As for plastic models, JB Models made a 1/76 version that is now sold by Airfix, but it is only recently that Ace has released a version in 1/72 scale.


The kit instructions are overly busy, and the numbering is a tad messed up, but it can eventually be figured out if you look at them hard enough. I ended up not following the exact order of assembly as written in the instructions.

The most confusing part is the suspension and lower hull, with many tiny and complex parts.

It is important to scrape off all the seam lines on parts C18 and C19. If you look closely at the parts, you should notice some divots that may need to be deepened with a rat-tail file so that parts C04 can fit between the struts.


Place parts C18 and C19 through part C23, then fit C23 to the side of the hull and apply liquid cement to all the parts.

Next, glue C17 and A10 in place, followed by parts C14.


After all that, glue parts C08 and C09 in place. The instructions don't really give a good indication of where they are supposed to be glued, or how they should be oriented.


Finally, glue parts C02 and C03 onto C01 and then glue the assembly to the hull. The ends of C02 and C03 should be glued to the neighboring parts C14 at that point as well.

Of course the most frustrating part of spending all the time building the complicated suspension is that it will hardly be visible after the wheels are attached.

Another place that needs a little clarification is when attaching A08/A09 to A06. It is easier to glue the ends of the vents in place before gluing A06 to the hull.


The hull was partially filled with pieces of sprue to give it a little bit of heft (similar to the solid feel of a PSC kit).


The parts of the turret are mislabelled, and the tabs of the underside need to be carved out, since it seems the designers forgot how they are supposed to work.


I thought that the Ace kit would have been a nightmare after working on so many quick build kits lately, but I did not find the kit to be difficult to build (though I think it was needlessly complex).

Another bright spot was that I only lost one of the dozen individual lift rings that need to be attached to the hull. Luckily the kit had two extras, so no additional scratch building was necessary.

All that needs to be done is to attach the wheels, add some final parts (tools, headlights, machine guns, commander figure), and paint the model.

The near final product is actually about 2mm shorter in length, and 1mm shorter in width and height than the Tiny Saracen. The turret also looks significantly smaller.


Now I'm a bit curious as to how the Ace model compares in size to the Airfix model.


Friday, June 4, 2021

Sd.Kfz. 251 ausf C

The Sd.Kfz. 251 ausf C was the penultimate model of the popular German half-track. The multi-angled rear hull made it one of the best looking members of the family.


There are three Sd.Kfz. 251 ausf C quick build kits that I know of (Armourfast, PSC, and Italeri). I currently have models from two of the manufacturers.

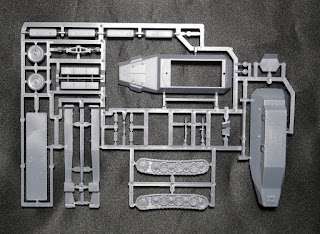
The Armourfast model has two identical sprues containing 28 parts in gray plastic.


The assembly of the Armourfast kit is fairly simple, but the fenders were a bit warped, and are not the easiest to install. There also wasn't any real indication of where to position the storage boxes on the sides of the hull, so a bit of guesswork is involved.

The PSC kit has three identical sprues containing 42 parts including passengers, crew, and stowage.


The PSC kit is well engineered, and goes together very easily without all the fiddliness of the Armourfast kit. It has minimal driver compartment detail, which is completely absent in the Armourfast kit.


I used the upper right corner of the gun shield as a low profile shield for the Pak36. Ideally the gun would have been mounted lower, but I added some sandbags from the 1/76 Fujimi Field Accessories set to provide additional concealment for the crew.


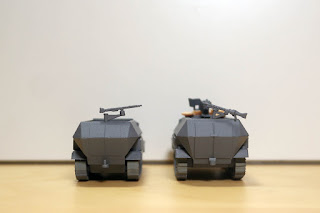
The PSC model (right) is about 2mm longer than the Armourfast model (left) because the angle of nose plate stretches out the front of the hull. The PSC model is also at least 1mm wider, and at least 1mm wider taller at least in part because of its wider diameter wheels.


The Armourfast model has finer panel lines than the PSC kit, and I like that it comes with separate headlamps.


The MG34s on the Armourfast kit are quite well done, but I think the thicker PSC MG34s will be less prone to damage.


A comparison of Armourfast (left), Dragon (center), and PSC (right) ausf Cs.


The dimensions of the Armourfast model are very similar to those of the Dragon model.

As a bonus, I've set up a comparison of an ausf A (far left), the three ausf Cs (center three in gray), and two ausf Ds (right side in camouflage).

The length of the First to Fight ausf A (left) is significantly shorter than the other models. It is almost 4mm shorter than the Armourfast model (right).

Viewed from the driver side, it can be seen that the Armourfast model is missing a muffler and exhaust pipe. It's can certainly be created out of sprue fairly easily, but it would have been better if the part was included in the first place.


I've abandoned building the ausf A since I have real doubts about the accuracy of its dimensions (based on the track record of FTF with their "75mm Schneider" and their Adler Kfz 13.

Last is a comparison of the two PSC Sd.Kfz. 251/10s – ausf C (left) vs. ausf D (right).


Both of the PSC kits were easy to put together, and the ausf D is very similar to the Forces of Valor ausf D in dimensions (but I'll save that for a more comprehensive post in the future).