Showing posts with label techniques. Show all posts

Tuesday, August 4, 2020

Cougar 6x6 MRAP, part 2

This is the continuation of my 4D MRAP build from last year, which I put on the back burner for various reasons.


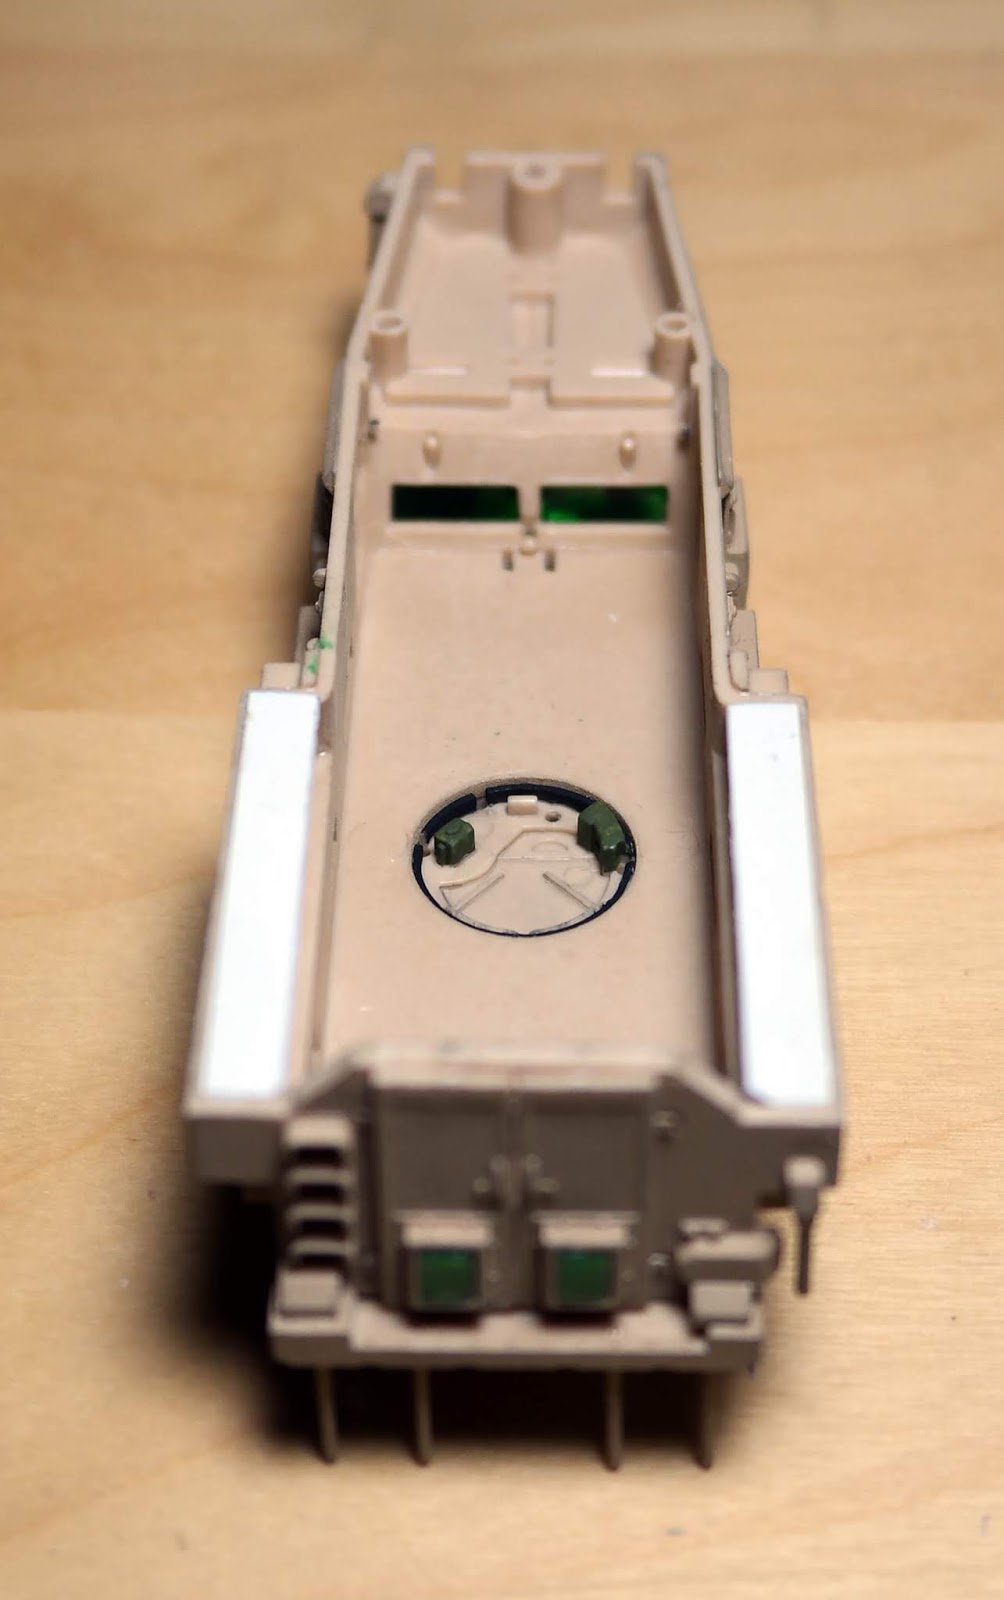
I painted the edges and inside facing surfaces of the windows with Tamiya Clear Green so that the paint wouldn't be scratched when I fitted the windows into position. The fit is really tight after painting, so no glue is needed for the windows. There is a large sinkhole on the IED jamming antenna that needs to be filled in.


I painted the interior of the vehicle, and added some dividers behind the crew compartment even though it will never be seen again after I close up the hull. The four large locating pins on the rear fenders were cut off because they are visible from the side (in the gap between the hull storage boxes and the fenders).


The dividers were created as an experiment on using tulle fabric as mesh. The tulle was attached to a wire frame with CA glue and the loose ends of the fabric were smoothed off with a soldering iron.

I tried using a lighter for my first attempt, but the tulle burst into flames, so be warned. The posts for the dividers are ~13mm high, but I'm not sure how far from the roof they are because the front doors were already glued shut.

Some plastic card (4mm x 34mm) was used to cover the bottom of the boxes in order to block visibility into the cabin when viewing the model from a low angle.


I cut out some windows in the turret to install clear panes, but found it was too difficult to get the correct dimensions with clear acetate. This stalled my build until last week, when I bought some clear UV curing resin to experiment with.


I taped the inside of the windows to seal the holes, then applied the resin. The nozzle is a bit too wide, so I'll probably use a gluing tip when applying the resin in the future. Still, the resin was not overly difficult to dispense since it flows well despite having a slight viscosity.


I ended up with some air pockets on the edges of the taped side, but these holes were filled in afterwards by adding a little more resin and allowing it to harden under the sun.

The resin hardens in about 5 to 10 minutes under the North County sun, but can take up to twice as long in the late afternoon.

The tape left residue on the resin, which I cleaned off with some UHU Tac. However, the surface was still cloudy looking afterwards. Going over the surfaces with a thin layer of UV resin or using some Future acrylic floor wax clears them right up though.

I also had issues with some small air bubbles, but I still think the windows turned out pretty well.


One major issue with the model is the positioning of the spare tires. If installed as directed, they protrude more than 5mm out from the sides of the vehicle.


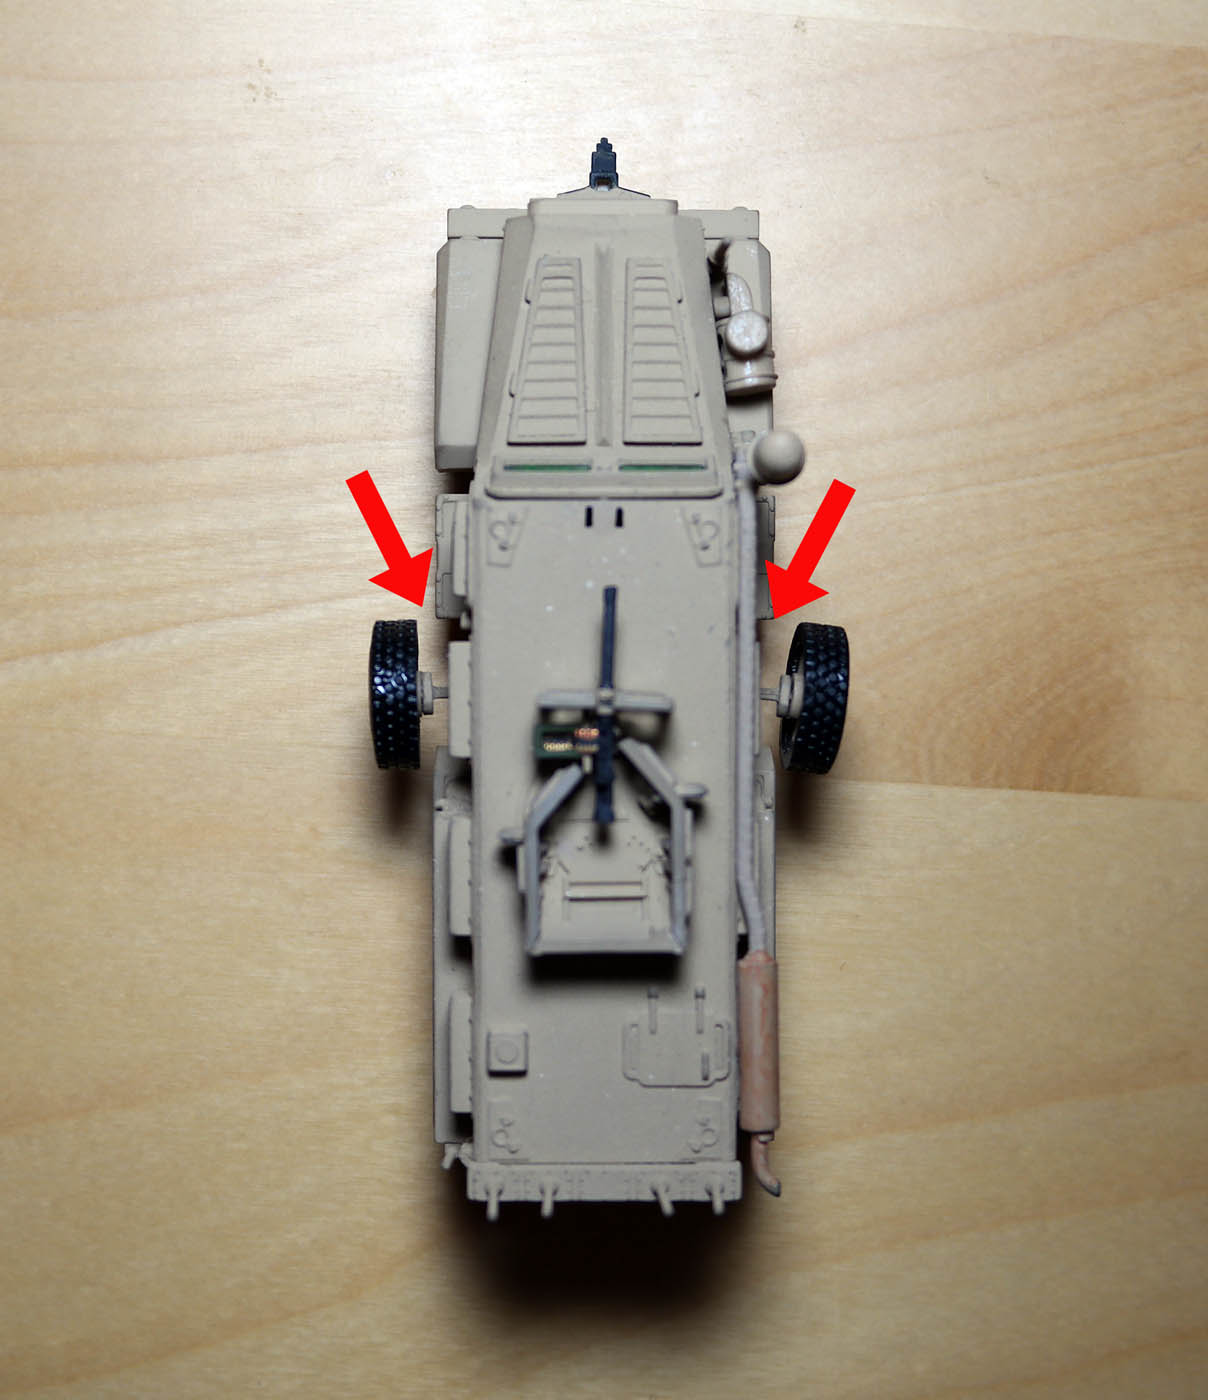
The positions of the tires on the actual MRAP is much closer to the body.


To solve the issue, it is necessary to cut away the middle of the tires before mounting them in place.


I also cut away the locator pin on the mount, then glued the tires in place, using the lower mounting bracket as a positioning guide.


To save the effort of doing all this, you can probably just leave the tire brackets off entirely, since I don't actually see a lot of vehicles that carry the spare tires.

I was going to add some wiring to the IED jamming antenna and the Rhino Anti IED Device, but decided not to since I don't see even 1/35 modelers going to that extent.

I scratch built a searchlight which I will embed in a clear resin dome, but since I don't have any materials for mold making right now, I'll have to wait to finish the model. Hopefully it won't take another year to get around to it.


In any event, here are some pictures of the near complete model at this point in time.


I think that the model is pretty decent. It has more parts than your typical quick build, but still retains many quick build features. It is also a great starting point for creating all the different variants of the vehicle, including the British Mastiff.


Tuesday, September 4, 2018

Püppchen


The Caesar 21cm Nebelwerfer 42 kit comes with an interesting little model of the 8.8cm Raketenwerfer 43 (which is not shown on the box art).


I could not find any real life pictures of a Raketenwerfer with skis like in the kit, but there are many toys and models of this specific type of rocket launcher.

Raketenwerfer without wheels (or skis).

This anti-tank weapon fired an 8.8cm fin stabilized rocket propelled HEAT grenade, and supposedly had such excellent performance that the OKH disallowed awarding a Tank Destruction Badge if it was used to successfully knock out a tank.

Raketen Panzer Granat 4312

The model has just seven pieces, and could be considered a very easy build except for one small issue – the model is made from polyethylene which is almost impossible to glue together.


There are a couple of methods for gluing polyethylene parts together. One method involves heat treating the plastic with a blowtorch, which I don't think will work for plastic models. The other is to treat the parts with a primer which will create a surface that CA glue will bond with.

The most commonly available glue for polyethylene is the Loctite Plastics Bonding System, which uses the priming method. The problem with this product however, is that the activator is applied with a pen-like applicator, which does not work well with small parts.


The activator can be purchased separately in liquid form as Loctite 770, but it costs about $10 an oz. From what I can tell however, it seems to just be n-Heptane which costs around $2 an oz. for the analytical grade stuff. You can also buy Bestine Solvent and Thinner which I believe is also n-Heptane for $1 an oz. (the route I went with).

I dipped the parts in Bestine, shook off the excess onto a disposable paper towel, and allowed the parts to dry for a minimum of 1 minute. After that, I just applied glue, and assembled the parts in the usual manner.


A test bond that I did with some pieces of the sprue from the model held with Bestine treatment, but the bond didn't have much strength. The control with no Bestine treatment didn't bond at all.

I wanted to make the test with the glue from the Plastics Bonding System, but my glue was all dried up, so I had to make do with Loctite Professional Liquid instead. I'm not sure if this made a difference, so maybe I'll do some more tests in the future.

The model itself seems to be holding up okay with normal handling, though I'm not sure how well it would fare with being used for gaming.


Important: If you plan on using Bestine or n-Heptane, Read the MSDS, be sure to work in a well ventilated area, and follow all safety procedures for handling dangerous chemicals. Heptane is flammable, a skin irritant, and potentially toxic if inhaled or ingested.


Monday, February 15, 2010

Undead Nellie


Compared above, are the HäT War Elephant (8023), and the Splintered Light Miniatures Skeletal War Mammoth (UNDE21). The HäT elephant is an African forest elephant which ranges from 7-8 feet at the shoulder, so the size of the figure is right on. The SLM mammoth however looks stumpy and dwarfish even for 15mm. The downward curving tusks are also not very mammoth-like.

Looking at some pictures of elephant skeletons, it seemed that the SLM mammoth could easily pass for a 20mm mammoth if something could be done about its legs. A mammoth can be anywhere from 9-15 feet at the shoulder.


Elephant: Shorter legs, so the rib cage appears lower to the ground.


Mammoth: The legs are long, so the rib cage appears higher.


Using my standard technique to embiggen figures, I cut off the legs where they joined the body. I then drilled holes in the body and glued some pins in place. I compressed the tibia to lengthen the bones, and then adjusted the pins to get the height I wanted for the skeletal mammoth. Instead of my standard procedure of drilling and gluing, followed by Kneadatite, I decided to try something different to re-attach the legs to the body this time.

The drilling process on thin pieces like limbs and bones is difficult and time consuming, while the glue and Kneadatite join is only just adequate. What I decided to do this time, was to join the parts with solder. It took a few attempts to get the soldering just right, but it turned out quite well I think.


I believe that part of the secret is that the two ends you are joining should be hot, though you have to be careful about melting your miniature. When the metal is cold, the solder just beads up, and will often just roll away. Solder seems to leave a solid join that does not have the slight flex of a Kneadatite join, so I like it a lot better. I'll finish by building up the bones with Kneadatite.

In addition, the SLM mammoth comes with a choice of three different heads, so I'm going to drill out the neck and install some rare earth magnets to allow swapping out the skull whenever I want a new look for the mammoth.


Friday, September 25, 2009

More Conversions

To save some effort in doing height conversions, I've started playing around with using pliers to lengthen limbs when only a minimal increase is required. To use this technique, I first find an area that does not have a lot of detail, and then squeeze the metal with narrow jawed pliers until the desired length is achieved. Kneadatite is then used to restore the shape of the limb.


I have found that I can perform height conversions much faster using pliers, than by cutting and pinning. The only problem I've encountered with this method is that sometimes I have ended up severing a figure's limb by weakening the metal too much. I'm not sure if this is related to the fact that I am using pliers with serrated jaws, but if I can find some smooth jaw pliers I'll have to test this hypothesis.

Of the figures below, I only used the compression method on the BRF Amazon and minotaurs. The rest were modified using the cut and pin method. The thick limbs of the minotaurs allowed more length to be squeezed from the metal before getting too weak, so I was able to add quite a bit of height to them. The charging minotaur looks pretty good, but the legs of the other minotaur look kind of strange.


I also thought that perhaps I made the maiden guards a little too leggy, but now I'm not so concerned.


I'll probably cast the midsection of this lizardman so I can just do a cut-and-paste job when converting the rest of my lizardman figures.


Friday, June 5, 2009

Goatkin

When I saw these Irregular Goatman Warriors (GOAT1), the first thing that came to mind were Gloranthan Broo. They are crudely sculpted, but it does not detract from the figures. As with all 15mm Irregular miniatures, there are about a bajillion different variants. For the Goatmen, they are armed with a variety of different weapons ranging from dagger to giant club. There is at least one variant with a cape and armor, but I do not have an example of that particular figure.


I did some experimentation in limb lengthening with a couple of the goatmen (the two directly to the right of George), and a SLM bugbear. I clipped off the legs, and drilled holes in the upper and lower halves for one goatman and the bugbear. The bugbear received standard straight pins in the legs, while bent pins were glued in place for a goatman. I found it more difficult to regulate the height of the miniature with bent pins, but the results turned out quite nice. Kneadatite was used to reinforce the bond between the pins and the lower legs before the upper body was glued in place.


For the second goatman (holding pan pipes), I tried a different technique to increase height. Using a pair of pliers, I compressed the metal in the legs until the goatman was as tall as the figure modified using pins. I then bent the legs so they would be articulated in a goat-like fashion. The process is simple, but leads to metal stress in the legs. I'm still debating whether to use Kneadatite or Bondo to reinforce the legs of the second goatman, as the articulation points in the leg are quite fragile.


For the other miniatures, Kneadatite was used to reinforce the join between the legs and upper body. It was also used to flesh out the legs. The bugbear will get a second treatment of Kneadatite, since his legs are too spindly at the moment.


And since I am covering the subject of creatures part goat and part human, I added a group shot of a SLM faun and satyr, an Irregular goatman, and a SLM goatman skeleton. While I like the SLM faun and satyr, I think the size of their heads make them a little too dwarf-like for my tastes. I'll have to keep an eye out for replacement heads, too see if that will make their appearance more palatable.


Monday, February 23, 2009

Height Increase Surgery

I purchased some 15mm miniatures from the Alternative Armies TTF line to determine whether I could use them for my purposes, but for the most part they are true 15mm figures.


Pictured to the right of George are the Human Illusionist (MDA47F), Human Magician with Wand (502F), Human Assassin (506F), Female Fighter in Plate (514F), Female Magic User (510F), and Female Cleric (511F). Except for the Illusionist, they are all small and slender compared to George. I imagine that their Barbarians and Asgardian may be larger figures as well, but I didn't have examples of the figures to add to the line-up. All of the female figures in the TTF line are the same size and proportions as the examples in the pictures above.


Taking a page from the plastic surgeon's handbook, I decided to perform cosmetic limb lengthening surgery on some of the figures. I used a razor saw to cut the miniatures into two pieces. I then drilled holes in the upper and lower halves of the figure, roughly in the position of where their legs would be.


I then cut the points from some pins, and used CA glue to attach them to the lower half of the miniatures (see picture above, far right). I wanted to extend the staff for the Illusionist, so I cut the skull from the end of the staff, and used a pin to increase the length.


After the glue dried, I cut the pins to the approximate length that I wanted to increase the height and did some dry-fitting and adjustment before gluing the upper half to the pins. The result is about a 4-6mm gain in height.


Kneadatite was used to fill in the gaps, and voilà -- 15mm miniatures become 20mm miniatures.