I just received my order of two of the latest Dark Alliance figure sets in the mail today, so here is a quick post on the figures.
The first set consists of Minotaurs.
The figures are well sculpted, and the minotaurs have some nice variation in the shape of their horns.
There was more flash on the figures than usual for a brand new Dark Alliance release, but it was not difficult to clean up, since the figures are so large.
The next set represents the Easterlings from The Lord of the Rings.
The figures have the Persian/Mughal appearance of the Easterlings from the Peter Jackson movies.
There is some nice variation in height, with the archers being half a head shorter than the other figures.
I also took some photos of the figures from the Heavy Warriors of the Dead set, since I had them nearby.
These figures represent the Dead Men of Dunharrow who make up the Army of the Dead from The Lord of the Rings.
The figures are actually quite versatile, and can be used as draugr, wights, Cauldron-Born, or other types of undead warriors. Many of the figures can also pass for regular warriors from the Dark Ages.
Friday, August 28, 2020
Saturday, August 22, 2020
Lunadiver Stingray
The Lunadiver Stingray is a ground attack craft from the SF3D universe. It was used by the Independent Mercenary Army against Shutoral forces on the Moon.
The 1/76 version was produced by Tenbowkissa a couple of years ago, and I've finally gotten around to putting my kit together.
The kit consists of 13 resin parts and a couple of lengths of guitar string for use as cable conduits.
The resin is the typical Tenbowkissa material that is nice and easy to clean up. There were no bubbles, but I need to do some work on the radar dish and tail boom where the casting gates were located.
It took about half an hour to drill, pin, and magnetize the parts, and another half an hour to put the kit together. Most of the time was spent trying to fit and install the guitar strings.
I used some electrical wire in the center of the guitar string to try and help it retain the curves that I wanted, but the end results were not that great.
A soft metal wire with a bigger diameter would have probably worked a lot better.
Now I just need to fill in the gaps between the joins, and paint the model.
I was originally thinking about using the color scheme for the 7th Yeomanry Regiment (which I've transformed to the 332nd Fighter Group in my mind).
However, the Tenbowkissa kit does not have the canister parts that I associate with this unit (due to their presence on the Hasegawa kit).
For this build I think I will go with the 241st Squadron Ghoul Skeleton markings, or maybe just plain aircraft gray like the Tenbowkissa showcase model.
Ghoul Skeleton |
CG animated short of Operation Dynamo
(no sound)
(no sound)
Labels:
gk,
ma.k,
science fiction,
tenbowkissa
Wednesday, August 19, 2020
Giant Lizards
The giant lizard has been a staple of cinema as a low budget option for stop motion dinosaurs since the making of the Academy Award-winning One Million B.C. in 1940.
The footage of giant iguanas from this film was recycled in dozens of low budget dinosaur movies in the following decades.
The Harryhausen remake of the movie employed a giant blue iguana as an homage to the original film.
Later, in the 1981 comedy Caveman, technology had advanced to a point where even the giant lizard was stop motion animated.
The giant lizard crossed over to D&D as mounts and beasts of burden for lizardmen and drow.
One of my grail miniatures has always been the Dragontooth miniatures Champion on Giant Lizard (SMC1) upon which the Sutherland illustration in the Holmes Blue Book was based.
I was finally able to obtain one of these miniatures, and will eventually paint it up in the color scheme of the original Sutherland miniatures. Next to it is a smaller Archive Giant Lizard (Dungeon Nasties 774).
Both of them seem to be modeled after iguanas of some type and are pretty difficult to find.
More commonly available miniatures include the Pathfinder Battles Hodag (Legends of Golarion #33) and the D&D Icons of the Realms Guard Drake (Tyranny of Dragons #22).
The Hodag has been linked to the Paul Bunyan legends by some sources, but no specific legend is ever mentioned. The closest explanation I could find seems to suggest that the Hodag is somehow related to an ox owned by Bunyan (presumably not his Blue Ox?).
The Guard Drake is still easy to find, but kind of expensive nowadays. I bought my miniatures when they were first released, at about a quarter of the price they sell for currently.
The final picture includes the Pathfinder Battles Monitor Lizard (Kingmaker #13). Based on how it's painted, this miniature seems to represent a Greater Monitor Lizard. While for something closer to real-life monitor lizards, Mick Yarrow sells a prehistoric Megalanio [sic] (Inuit 86) stated to be for 15mm figures, but which I think falls within the size range of Megalania at 1/72 scale.
I still think that the Dragontooth miniature is the ideal giant lizard. I wish that there were some similarly sized plastic toy marine iguanas that I could use to assemble a squadron of lizard cavalry.
Labels:
archive,
cmg,
dragontooth,
my miniatures
Monday, August 10, 2020
Chalawan
Chalawan (ชาละวัน) is a crocodile spirit from the Thai folktale Kraithong (ไกรทอง). The story was adapted into a lakhon nok play credited to King Rama II, and has received a number of film adaptations over the years.
|
The story is so popular, that there is even a Thai craft beer named after Chalawan.
Anyone think their logo looks familiar? |
In the story, Chalawan lives in a cave containing a magical crystal that gives all the crocodiles within human form. Outside of the cave however, he appears as an enormous crocodile. On occasion, Chalawan is also depicted as being half-man, half-crocodile.
A Cambodian take on the story can be seen in the film Kropeu Charavan (ក្រពើឆារ៉ាវ៉ាន់) aka The Crocodile Men. In this film, Chalawan (Charavan) is fully human, but knows a spell to transform into a crocodile.
The spell is very reminiscent of legends about the Indonesian power of tiang maleh rupa that allows people to change into crocodiles, or crocodiles to change into humans. And in fact, these legends are often credited as being the source for werecrocodiles in RPGs. In the Indonesian horror movies based on these legends, these creatures always seem to be albino crocodiles (buaya putih).
For more inspiration on magical crocodiles, I turned to the first issue of the zine A Thousand Thousand Islands, by Zedeck Siew, with art by Mun Kao.
MR-KR-GR describes a land of crocodiles and their human subjects. The zine introduces us to the Place of Crocodiles, but does not delve deeply into detail so I'm not sure I can characterize it as a gazetteer. The setting is painted with broad strokes, yet is evocative and tantalizes the reader with bits and pieces of the wondrous and grotesque.
Zedeck doesn't have any plans to make a comprehensive guide for his setting since he prefers the open-ended feel of the different locales introduced in his zines, but I personally would want to do a lot of research into the culture and mythology of Southeast Asia to do justice to the setting. Nevertheless, there are many people who can take off running with it just fine, so it is certainly not a hindrance to not have any sort of detailed background.
I'm not sure if there is currently any stock of the latest printings of the zine, but you can always contact Zedeck to check on availability.
Anyway, on to miniatures. There are several companies that make crocodile-men, including Privateer Press (Gatormen) and Crocodile Games (Sebeki), but the only series of miniatures that are close in size to 1/72 scale figures are the old C19 and RR11 Lizardmen from Citadel.
Grenadier also made the Caroc (Monster Manuscript Vol.II 1502, MM10) which I think matches well with the Citadel miniatures.
For regular crocodiles there are a lot of different plastic toys that can be used, but most of them are probably too large for use with 1/72 scale figures.
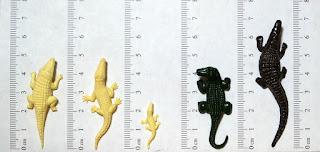
I only have the Airfix crocodile from the Tarzan figure set (01733), while all my other figures are actually alligators. The adult and baby alligators are from the Airfix Zoo Animals No. 1 set (01724). Next is a Galoob alligator from the National Geographic Collection Swamp Adventure set, and at the end is the Marx alligator from the Noah's Ark playset.
Last but not least is the D&D Icons of the Realms Crocodile (Waterdeep Dragon Heist #30), which can be used as a large saltwater crocodile.
Tuesday, August 4, 2020
Cougar 6x6 MRAP, part 2
This is the continuation of my 4D MRAP build from last year, which I put on the back burner for various reasons.
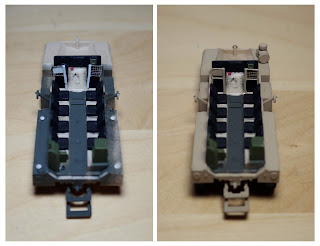
I painted the edges and inside facing surfaces of the windows with Tamiya Clear Green so that the paint wouldn't be scratched when I fitted the windows into position. The fit is really tight after painting, so no glue is needed for the windows. There is a large sinkhole on the IED jamming antenna that needs to be filled in.
I painted the interior of the vehicle, and added some dividers behind the crew compartment even though it will never be seen again after I close up the hull. The four large locating pins on the rear fenders were cut off because they are visible from the side (in the gap between the hull storage boxes and the fenders).
The dividers were created as an experiment on using tulle fabric as mesh. The tulle was attached to a wire frame with CA glue and the loose ends of the fabric were smoothed off with a soldering iron.
I tried using a lighter for my first attempt, but the tulle burst into flames, so be warned. The posts for the dividers are ~13mm high, but I'm not sure how far from the roof they are because the front doors were already glued shut.
Some plastic card (4mm x 34mm) was used to cover the bottom of the boxes in order to block visibility into the cabin when viewing the model from a low angle.
I cut out some windows in the turret to install clear panes, but found it was too difficult to get the correct dimensions with clear acetate. This stalled my build until last week, when I bought some clear UV curing resin to experiment with.
I taped the inside of the windows to seal the holes, then applied the resin. The nozzle is a bit too wide, so I'll probably use a gluing tip when applying the resin in the future. Still, the resin was not overly difficult to dispense since it flows well despite having a slight viscosity.
I ended up with some air pockets on the edges of the taped side, but these holes were filled in afterwards by adding a little more resin and allowing it to harden under the sun.
The resin hardens in about 5 to 10 minutes under the North County sun, but can take up to twice as long in the late afternoon.
The tape left residue on the resin, which I cleaned off with some UHU Tac. However, the surface was still cloudy looking afterwards. Going over the surfaces with a thin layer of UV resin or using some Future acrylic floor wax clears them right up though.
I also had issues with some small air bubbles, but I still think the windows turned out pretty well.
One major issue with the model is the positioning of the spare tires. If installed as directed, they protrude more than 5mm out from the sides of the vehicle.
The positions of the tires on the actual MRAP is much closer to the body.
To solve the issue, it is necessary to cut away the middle of the tires before mounting them in place.
I also cut away the locator pin on the mount, then glued the tires in place, using the lower mounting bracket as a positioning guide.
To save the effort of doing all this, you can probably just leave the tire brackets off entirely, since I don't actually see a lot of vehicles that carry the spare tires.
I was going to add some wiring to the IED jamming antenna and the Rhino Anti IED Device, but decided not to since I don't see even 1/35 modelers going to that extent.
I scratch built a searchlight which I will embed in a clear resin dome, but since I don't have any materials for mold making right now, I'll have to wait to finish the model. Hopefully it won't take another year to get around to it.
In any event, here are some pictures of the near complete model at this point in time.
I think that the model is pretty decent. It has more parts than your typical quick build, but still retains many quick build features. It is also a great starting point for creating all the different variants of the vehicle, including the British Mastiff.
Labels:
4d,
armored vehicle,
techniques
Subscribe to:
Posts (Atom)