Showing posts with label dragon. Show all posts

Thursday, November 25, 2021

4D 8-Rad

The latest offerings from 4D Models consist of three 8-wheeled vehicles and one tracked vehicle.

The first two kits are WWII German heavy armored cars. They are both referred to as "Cougar" armored cars in the translated text, since the same word is used for both "cougar" and "puma" in Chinese. In any event, I will use the word "puma" for the purposes of this post.


4D Model also seems to be doing OEM for a company called Pambest, who are selling the 4D kits under their Pocket P Museum brand (the marketing material looks to be styled after the Kaiyodo Capsule Q Museum series).

Pocket P Museum

Capsule Q Museum

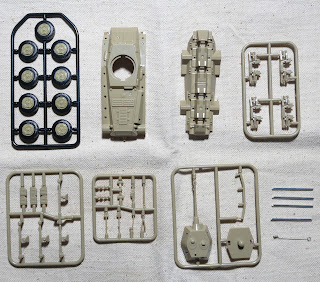
The first model is the Sd.Kfz.234/2 Puma Armored Reconnaissance Vehicle (美洲狮裝甲偵察车), consisting of 26 parts in khaki plastic, 9 wheels in black plastic with painted hubs, 4 metal axles, and a wire antenna.


The second model is the Sd.Kfz.234/3 Puma Wheeled Armored Vehicle (美洲狮轮式裝甲车), which we might also call a Stummel 8-rad, consisting of 50 parts in tan plastic, 9 wheels in black plastic with painted hubs, 4 metal axles, and a wire antenna.


The models go together very quickly and easily, but the directions for how the axles fit onto the chassis are the opposite for the two models, and I couldn't figure out which direction was correct at first.


In the end, I think the instructions are both half-right, and there should be a pair of struts pointing forward, and a pair pointing backward.

Immediately there are several obvious issues with the models, including the poorly rendered jerry cans, and lack of tread pattern on the tires.


The barrel of the Puma is warped, and has the vents opened to the top and bottom as opposed to the sides. The smoke launchers are poorly represented, and only have two dischargers on each side.


Meanwhile, the Stummel has markings that are out of register, a poorly formed co-axial machine gun, and big, chunky steering wheels.

The models are strictly wargaming pieces, and are not the best representatives of the 4D Model offerings. They do have the advantage of tools that are provided as separate parts, and the Stummel comes with a rudimentary interior.


It probably wouldn't be too hard to make them into passable display models either, if you really wanted to.


I didn't use the wire antenna on the Puma because the instructions tell you to install part 4B, and then cut it off to leave a post for the metal antenna. If I had looked carefully at the instructions before starting, I would have just used a piece of sprue for the post, and saved the part for something else.


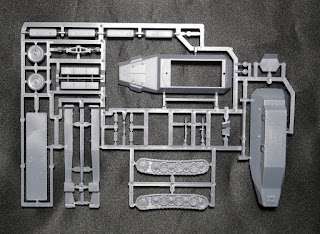
The next two models are modern PLA vehicles consisting of the ZBD-04A Tracked IVF (ZBD-04A 步兵战车步兵战车), and the ZBL-09 Snow Leopard IVF (雪豹 ZBD-09式 步兵战车).


The ZBD-04A consists of 43 parts in tan plastic (a green version of this model also exists), and two wire antennae.


The ZBD-09 consists of 26 parts in green plastic, 8 wheels in black plastic with painted hubs, and 4 metal axles.


Assembly of the models is very simple, but one interesting feature is the way the bustle racks for the ZBD-04 require folding before installation.


This is something you would typically do with photoetch, but the properties of the plastic used for the kit makes it possible to get a similar effect without the need for special tools, or having to complicate the mold.

I painted the tracks and wheels of the ZBD-04 before assembly because the side skirts would make painting difficult after the upper and lower hulls are connected.


The ZBD-04 has a choice of two configurations based on the parts attached to the hull. I went with option 1, but I'll probably order another model to build the other configuration.


Hatches on the hull and turret can open and close, but a bit of clean-up may be needed for the hull hatch to fully close. The barrel can pivot up and down, and the turret can rotate.


The 4D ZBD-09 is very similar to the Dragon Armor ZBL-09, albeit a bit less detailed. Both chain-guns are simplified and fixed in a raised position.

4D (left) v Dragon (right)

For both models, options are provided to have the turret hatches opened or closed. I went with the closed option for the 4D model, and open option for the Dragon model.

Dragon (top) v 4D (bottom)

The Dragon model comes with two doors for the rear hatch to allow the model to be displayed with open or closed hatch. The 4D model has a hinged door so the hatch can open and close.

Dragon (left) v 4D (right)

The only thing that was obviously inaccurate on the 4D model from what I can tell are the front mirrors.


The mirrors of the Dragon model are the correct rectangular shape, while the 4D model has round mirrors.

Overall, I would say that the models are not too bad, though they would look more like actual PLA vehicles if they were painted with [digital] camouflage. It's also odd that the national markings do not have the "八一 " inside the emblem, which makes them look a bit off.

Friday, June 4, 2021

Sd.Kfz. 251 ausf C

The Sd.Kfz. 251 ausf C was the penultimate model of the popular German half-track. The multi-angled rear hull made it one of the best looking members of the family.


There are three Sd.Kfz. 251 ausf C quick build kits that I know of (Armourfast, PSC, and Italeri). I currently have models from two of the manufacturers.

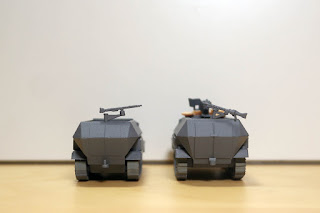
The Armourfast model has two identical sprues containing 28 parts in gray plastic.


The assembly of the Armourfast kit is fairly simple, but the fenders were a bit warped, and are not the easiest to install. There also wasn't any real indication of where to position the storage boxes on the sides of the hull, so a bit of guesswork is involved.

The PSC kit has three identical sprues containing 42 parts including passengers, crew, and stowage.


The PSC kit is well engineered, and goes together very easily without all the fiddliness of the Armourfast kit. It has minimal driver compartment detail, which is completely absent in the Armourfast kit.


I used the upper right corner of the gun shield as a low profile shield for the Pak36. Ideally the gun would have been mounted lower, but I added some sandbags from the 1/76 Fujimi Field Accessories set to provide additional concealment for the crew.


The PSC model (right) is about 2mm longer than the Armourfast model (left) because the angle of nose plate stretches out the front of the hull. The PSC model is also at least 1mm wider, and at least 1mm wider taller at least in part because of its wider diameter wheels.


The Armourfast model has finer panel lines than the PSC kit, and I like that it comes with separate headlamps.


The MG34s on the Armourfast kit are quite well done, but I think the thicker PSC MG34s will be less prone to damage.


A comparison of Armourfast (left), Dragon (center), and PSC (right) ausf Cs.


The dimensions of the Armourfast model are very similar to those of the Dragon model.

As a bonus, I've set up a comparison of an ausf A (far left), the three ausf Cs (center three in gray), and two ausf Ds (right side in camouflage).


The length of the First to Fight ausf A (left) is significantly shorter than the other models. It is almost 4mm shorter than the Armourfast model (right).

Viewed from the driver side, it can be seen that the Armourfast model is missing a muffler and exhaust pipe. It's can certainly be created out of sprue fairly easily, but it would have been better if the part was included in the first place.


I've abandoned building the ausf A since I have real doubts about the accuracy of its dimensions (based on the track record of FTF with their "75mm Schneider" and their Adler Kfz 13.

Last is a comparison of the two PSC Sd.Kfz. 251/10s – ausf C (left) vs. ausf D (right).


Both of the PSC kits were easy to put together, and the ausf D is very similar to the Forces of Valor ausf D in dimensions (but I'll save that for a more comprehensive post in the future).


Tuesday, March 1, 2016

White Elephants

Sometimes when an impressively large model catches my eye, I have to take a reality check and think about whether there is any point in owning the thing.

Here are a few items that gave me a moment of pause before I decided not to buy them.

1. Kyoshinhei by Good Smile Company


This figure represents a God Warrior from the Studio Ghibli short film produced for a 2012 exhibit at the Museum of Contemporary Art Tokyo.


Giant God Warrior Appears in Tokyo posted by f711513007

At 50cm in height, the figure is impressive, but I have to say that it would be well under it's actual 1/72 height as represented in the short.

The figure is still probably very undersized compared to the original God Warrior as presented in Nausicaä of the Valley of the Wind.


Scale issues aside, the final price with shipping would have been very high, and there was the very real possibility that the model could have sustainded damaged during shipping (polystone resin is not the most durable of materials).

2. Colossal Titan Coin Bank by Bandai


This PVC figure represents the aberrant type 60m Titan from Attack on Titan.


The Colossal Titan at 60cm, is even taller than the God Warrior. It is actually 1/100 scale, but that's something I would have been willing to overlook with regard to a fictional flayed giant.

3. Flower-class Corvette by Revell


Even now, I often contemplate buying this kit, but at 85cm in length I wonder where I would store it. The pool might be an option, but I couldn't keep it docked there all the time.

4. U-Boat Type VIIC by Revell


I would seriously consider a waterline U-boat since they could be used for gaming every now and then, but at 93.3cm long, the type VIIC and the even larger type IXC submarine (106.3cm) are just really big.

I suppose that the kit could be converted easily enough to a waterline model, but that seems almost like throwing away half the kit.

5. Skipjack-class Submarine by Moebius Models


As with the U-boats, I would definitely consider a waterline model of the Skipjack for an Ice Station Zebra scenario, but at 106.7cm, the full hulled kit is a monster. I believe that this model is also sold in Revell packaging.

6. Gato-class Submarine by Revell


Yet another submarine. This time the 132cm long Gato-class sub. If I were to have bought this model, I would have been tempted to get two. One built up in the standard way, and one built up as the USS Sea Tiger from the 1959 film Operation Petticoat.

Balao-class submarine

However, I probably would have been bothered by the fact that the subs used in filming were actually Balao-class submarines, while the USS Seadragon which reputedly operated in red primer color for a time was a Sargo-class submarine.

7. C3-type Cargo Submarine by Lindberg


Lindberg went out of business, but the kits are still being produced by Round 2 LLC under the Lindberg brand name. The model is 148.6cm long, and comes with four Kaiten manned torpedoes.

8. Saturn V Rocket by Dragon


There was a time when I was really interested in getting the 1/96 scale Revell Saturn V, but by the time the Dragon version came around, that desire was a distant memory. At 153.7cm tall, I'm not sure if there is a commercially produced 1/72 kit that is larger than this one.

In closing, I'll have to admit that at times I look at my existing piles of lead and plastic and wonder what the point of it all is. However, finishing a project no matter how small, or getting to play a game with newly painted miniatures always brings a sense of satisfaction, and puts me back to the proper hobbyist perspective.


Saturday, July 27, 2013

Japanese Tank Collection

While looking at Japanese blogs, I stumbled upon an entry in the Strange Mecha Blog (いろものメカ雑記帳) that cleared up some of the mystery around the "Precise" tank models from my last post.

The models were announced during the Summer Wonder Festival in 2008, and were actually produced for distribution by CaféReo. I'm not sure how the name Precise came to be attached to them, but maybe that was the company that did the manufacturing for CaféReo, or maybe it is the company that held all of the old stock.


CaféReo is primarily known as a distributor of anime character goods and 1:144 scale gashapon aircraft. The tanks were part of a proposed 1/72 Japanese Tank Collection (1/72 日本戦車コレクション) which, for whatever reason, never came to fruition. There were actually a total of  9 models in the collection (as opposed to the 8 that I mentioned in my last post).

The complete set consists of three Chi-Ha medium tanks, two Ho-Ni SPGs, two Chi-Nu medium tanks, a Ha-Go light tank, and a Chi-Ri medium tank. The two additional tanks not shown in my previous post are a Ho-Ni in camouflage, and the Chi-Ri.


I started assembly of the Shinhoto Chi-Ha tanks first. The few small parts supplied on sprues are easy to remove and glue in place, requiring only a bit of touch-up for the paint. There was one piece I could not really identify, and have no idea of where to place it.


Attaching the tracks was the most difficult part of putting these models together. The vinyl tracks were all bent and twisted, and needed treatment with a blow dryer to get most of the bends out of them.

Because of some recent bad luck with joining rubber/vinyl tracks with my soldering iron, I decided to try out Shoe Goo to test how well it worked on the tracks.


I cleaned off and roughened the surfaces to be joined. I put a bit of Shoe Goo on each end, and then pressed them together. I think that the trick is to make sure not to press the overlapping ends too hard and squeeze all the Goo out from between them.

After the Goo set, I removed the upper hull of the tank. I stretched sections of the track until it became long enough to go around the drive sprocket and idler, then gently worked them around the road wheels.


The tank on the left has the pre-1942 camouflage style (which may not be accurate for the Shinhoto Chi-Ha), while the tank on the right has the 1942-43 China/Home Islands type camouflage, with markings from the Moeyo! Tank School (萌えよ!戦車学校) manga hand-painted by yours truly.


The next picture is of the Chi-Ha with 120mm (L/12) short naval gun (sometimes referred to as a howitzer). I haven't seen any pictures of the tank with markings, but I added the IJN/SNLF anchor because it looks cool.


Assembly of the Ho-Ni is very similar to that of the Chi-Ha. It comes with a very rudimentary interior that seems fairly accurate in layout.


Judging by appearance, the gun is the 75mm Type 90 field gun. Making the model a Type 1 Ho-Ni I. The gun itself is pretty crude, and can move on two axes. Unfortunately due to it being front heavy, the barrel cannot really stay in an elevated position.


I tried drilling out the underside of the breech block and adding some metal to act as a counterbalance for the barrel, but it didn't do any good.


The tank on the left has the Japanese "parched grass" base coat color, while the one on the right is in 1942-43 style camouflage.


The Chi-Nu was a little more work to assemble. The headlamps need to be adjusted to the proper length before being attached, and the pick needs to be attached in a way that does not interfere with turret rotation.

The tank on the left is in the 1942-43 style camouflage, while the one on the right has the Japanese base coat color.


The tracks of the Ha-Go were the real test of effectiveness for Shoe Goo. The overlap between the tracks were very short, so the Goo needs to be pretty strong to maintain the bond under tension. The tracks can be quite a struggle to get on, since the two halves of the rear idler were almost too close together, making it difficult to fit the teeth of the tracks between them. The Goo did hold up though, so I think that for rubber band type tracks it will be my method of choice for attachment in the future.


The Chi-Ri was the easiest of the tanks to assemble. The tracks are the most pliable of the bunch, and go on a lot easier. Unfortunately, they do not fit around the drive sprockets easily, though with a bit of work I believe that it could be managed. There are locator holes are present for attaching a machine gun and a jack, but these parts are absent from the sprue.


I scavenged the machine gun and jack from other models to complete the tank. It is in base coat color with no markings.


A comparison of CaféReo, and Altaya Shinhoto Chi-Ha tanks. The Altaya tank (right) is one of the old metal models. The hull of the Altaya model is slightly longer than that of the CaféReo model.


A comparison of Chi-Ha and Shinhoto Chi-Ha tanks. The two tanks to the left are early Chi-Ha tanks with the 57mm gun from AmerCom and Dragon. The two tanks to the right are the Shinhoto Chi-Ha tanks from CaféReo, and Altaya. The AmerCom, Dragon, and CaféReo tanks are nearly identical in dimensions.


A comparison of Dragon, and CaféReo Ha-Go tanks. The Dragon tank (left) is the Manchurian version fitted with auxiliary wheels. These were added because the tank had problems crossing the ridges and furrows of ploughed kaoliang fields.


The two are near identical in size. The one major difference that I see is that the rear deck of the CaféReo tanks sits higher than that of the Dragon tank.


A comparison of a Panther, the Chi-Ri, and a Jagdtiger.


My final impression of the CaféReo models is that with the proper enhancements, they can be made into great scale models. The tracks are particularly bad (in part because the drive sprockets are sometimes assembled crooked), and could do with some Dragon DS replacements. Unfortunately, I'm not that ambitious, and even getting them to the stage they are currently in is already a great accomplishment nowadays. I do however have some damaged models that I may one day use for such a purpose.