Showing posts with label armorfast. Show all posts

Friday, June 4, 2021

Sd.Kfz. 251 ausf C

The Sd.Kfz. 251 ausf C was the penultimate model of the popular German half-track. The multi-angled rear hull made it one of the best looking members of the family.


There are three Sd.Kfz. 251 ausf C quick build kits that I know of (Armourfast, PSC, and Italeri). I currently have models from two of the manufacturers.

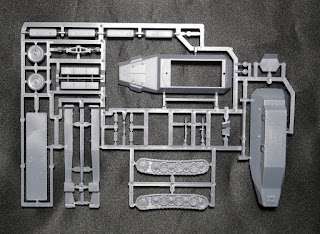
The Armourfast model has two identical sprues containing 28 parts in gray plastic.


The assembly of the Armourfast kit is fairly simple, but the fenders were a bit warped, and are not the easiest to install. There also wasn't any real indication of where to position the storage boxes on the sides of the hull, so a bit of guesswork is involved.

The PSC kit has three identical sprues containing 42 parts including passengers, crew, and stowage.


The PSC kit is well engineered, and goes together very easily without all the fiddliness of the Armourfast kit. It has minimal driver compartment detail, which is completely absent in the Armourfast kit.


I used the upper right corner of the gun shield as a low profile shield for the Pak36. Ideally the gun would have been mounted lower, but I added some sandbags from the 1/76 Fujimi Field Accessories set to provide additional concealment for the crew.


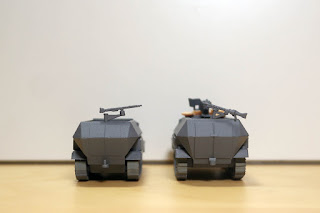
The PSC model (right) is about 2mm longer than the Armourfast model (left) because the angle of nose plate stretches out the front of the hull. The PSC model is also at least 1mm wider, and at least 1mm wider taller at least in part because of its wider diameter wheels.


The Armourfast model has finer panel lines than the PSC kit, and I like that it comes with separate headlamps.


The MG34s on the Armourfast kit are quite well done, but I think the thicker PSC MG34s will be less prone to damage.


A comparison of Armourfast (left), Dragon (center), and PSC (right) ausf Cs.


The dimensions of the Armourfast model are very similar to those of the Dragon model.

As a bonus, I've set up a comparison of an ausf A (far left), the three ausf Cs (center three in gray), and two ausf Ds (right side in camouflage).


The length of the First to Fight ausf A (left) is significantly shorter than the other models. It is almost 4mm shorter than the Armourfast model (right).

Viewed from the driver side, it can be seen that the Armourfast model is missing a muffler and exhaust pipe. It's can certainly be created out of sprue fairly easily, but it would have been better if the part was included in the first place.


I've abandoned building the ausf A since I have real doubts about the accuracy of its dimensions (based on the track record of FTF with their "75mm Schneider" and their Adler Kfz 13.

Last is a comparison of the two PSC Sd.Kfz. 251/10s – ausf C (left) vs. ausf D (right).


Both of the PSC kits were easy to put together, and the ausf D is very similar to the Forces of Valor ausf D in dimensions (but I'll save that for a more comprehensive post in the future).


Sunday, January 30, 2011

T-34 & S-35

2010 ended on a rather difficult note, so it is only now that I find myself making the first post of 2011. In any event, I'm still walking and talking, so I guess there's not much to complain about.

This year I've resolved to complete all the near-finished models that I have laying about in order to clear out some benchspace for starting my 1/72 Dora railway gun.

The first two kits that I'm almost done with are the Armorfast T-34 mentioned in a post from 2008, and a Heller SOMUA S-35. The models still need markings and to be weathered, but are otherwise mostly finished.

The only problem I have is to find some way to simulate lenses for the headlamps. I'll probably just shape some pieces of clear sprue and glue them into the appropriate areas already carved into the headlamps.

Armorfast and Forces of Valor T-34s


The Armorfast T-34 is slightly taller, and slightly longer than the FoV T-34, but the turret of the FoV T-34 is larger than the turret of the Armorfast T-34. I have no idea of which is more accurate.


I'm not sure if it is so obvious in this picture, but I used a heated splatter screen to make tread pattern imprints in the previously smooth tracks of the Armorfast kit. They're not the prettiest or most accurate tracks you'll see, but better than the smooth featureless treads of the typical quick build kit.

Altaya and Heller S-35s


I believe that these are the only S-35s in 1/72 scale. They're practically identical in size.


The Heller kit is actually rather nice, despite soft details and the horrible tracks. I actually would like to build a couple more of these sometime in the future.


Sunday, June 8, 2008

Armourfast T-34/85

I started this particular Armourfast T-34/85 (No. 99009) when I was living in the Bay Area. How, you may ask, can someone make so little progress over two years with a model that consists of only eight pieces? To which I would have to reply, that this model needs a lot of work to make a passable T-34. The first thing I had to do was to thin down the treads. The treads were so thick that they made the tank tower over other 1/72 T-34s. The next step was to drill holes in the wheels and add bolt heads on the road wheels. I used the little beads from the inside of a Brita pitcher filter cartridge for bolt heads. Unfortunately I lost all the beads when I moved, so only the right wheels have bolts in them. I added some fuel drums from a PST tank kit, a scratchbuilt headlamp, and wire grab handles.


Recently I decided to try and make some progress on this kit, so I shaved off the turret ring that was molded into the hull of the tank. This ring should be part of the turret. I affixed a 22 mm washer to the turret using CA glue, and applied Kneadatite to fill in gaps. The diameter of the washer is slightly large, but I could not find anything 21 mm at the hardware store.


If the washer looks asymetrically positioned, it is because a) I needed it positioned so that the turret could rotate freely, and b) because the turret actually is asymatric on this model.


Monday, April 28, 2008

Sandbagged Sherman

The Hat Shermans are not bad, but they look rather plain when built up OOB. I decided to spruce this M4A3(76) from the Armourfast line (99012) with sandbag armor.


The sandbags were created with Crayola Model Magic. The side cages were built with Evergreen (white) and Plastruct (gray) plastic strips.


Unfortunately the Model Magic shrank a lot more than I expected, so the sandbags don't press up against the cage as I wanted.