Showing posts with label ordnance. Show all posts

Saturday, June 13, 2020

BL 8-inch Howitzer Mark VI

The BL 8-inch howitzer Mk.VI was a seige howitzer used during WWI and WWII. Roden makes a 1/72 kit which I believe is a scaled down version of their 1/35 model.


The gun is molded in very soft plastic, so exercise care when removing/handling the thinner parts as they are very prone to breakage.

Nevertheless, it was a fairly simple build, and I spent more time trying to decipher the instructions and searching for reference images than actually putting the model together.

For step 2, I added the ground spade (28E), but many of the pictures that I see of the howitzer don't seem to use it. Most of the time it looks like the trail is set on some kind of rail.

Step 3 has some typos, and parts 32E/33E can probably be installed more easily during this step.


I used the wheels (1F) to help with aligning the brakes (7F), and also recommend not attaching the handwheels (8E) until the howitzer is almost complete.

For step 4, I needed to create a replacement tow hook because part 31E was short shot.


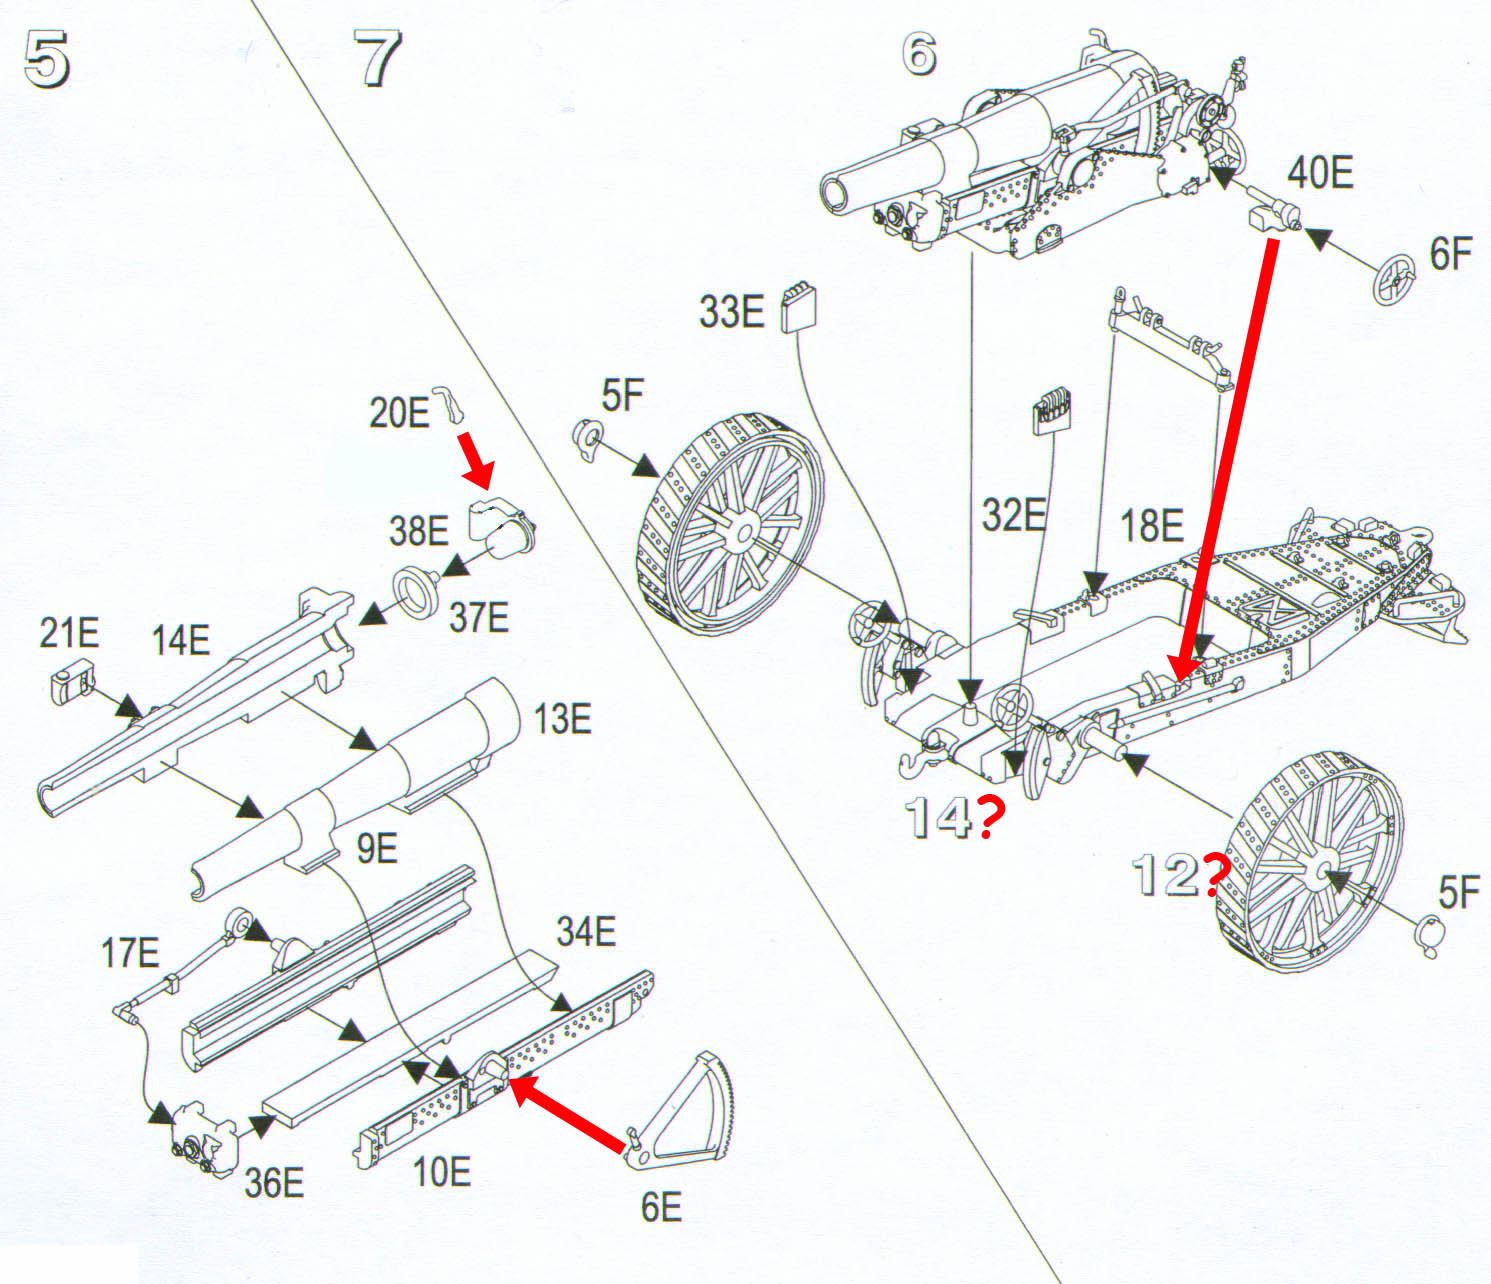
Step 5 only shows one side of the gun, so it's not really clear how or where some of the parts are supposed to fit. It doesn't help that some of the arrows point to puzzling locations. Luckily, Landships has excellent images of how these parts should fit.

Step 6 also has some typos, and some of the parts don't look much like the drawings.


I built 3E/11E/12E/41E with the gun assembly, but allowed the barrel to pivot freely. While the glue was still setting, I aligned everything with the carriage to make sure that the mount fit properly. After the gun mount was aligned, parts 23E/39E were glued on and checked for fit with the carriage.


Next, decide on the how you want to display the howitzer and fix the position of the barrel in the mount with glue. In tow configuration, the end of the gun mount is connected to the gun lock (18E).

In loading position, the barrel is parallel to the carriage. I was originally thinking of building the howitzer with the breech open for loading, but it would have meant filling in the seams on the inside of the barrel, so I changed my mind.

Attach 16E/19E/35E after the barrel is glued in place. These parts were the most difficult for me because I couldn't really find any close up pictures of how they fit together.


I don't see the gun lock in many pictures so I left off part 18E and substituted a metal pin instead, but there are location holes to fit it on the right trail if you want to include it in your build.


I'm guessing that the lock got in the way of the loading tray so it was taken off when the howitzer was used in the field.

For step 7, just glue 40E into the notch in the trail instead of to the gun mount.


There will be a couple of extra pieces left over after the build. I'm not sure what part 15E is, but it looks like a part for Mk I-V howitzers.


Now I just need to attach the treads to the wheels and paint. It should be noted that there has been some controversy regarding the orientation of the tread pattern, but I will follow the mirrored look as shown below.


Monday, August 27, 2018

155mm De Bange mle. 1877


The Canon de 155 Long was a fortress gun developed in the period after the Franco-Prussian War by the aptly named Charles de Bange. The gun saw use in WWI with the French, and later in WWII with the Finns.

I picked up the Wespe (ex-Retrokit?) model because I liked the look of the gun, particularly with the cingoli tracks on the wheels. The model is made of a decent resin that is not as brittle as the type that is typically favored by a lot of European manufacturers.

The parts were largely free of flash and had few bubbles, however, several of the track links for the cingoli were either not fully cast or broken.


Part 15 was mislabeled in the original instructions. It is correctly identified in my version of the parts breakdown. The former part 15 is now labeled part 28, but the kit only provides one piece instead of the required two pieces. The original instructions do not even indicate how this piece(s) is supposed to be used.

There are additional errors in the instructions, and the assembly guidelines definitely need to be fleshed out a little better. I recommend breaking the build into three separate steps: cannon, wheels, and carriage.


Cannon assembly is pretty straight forward. Part 22 is a lift ring for the 1916 version barrel, so the original lift ring must be removed if you want to use this one.


Part 28 fits onto the trunnion, and should not be glued. Wespe put their display model together using part 22 instead of part 28, or maybe they had part 22 on one side, and part 28 on the other.


Since I only had one piece, I made do with some scratch built parts. The ends of the trunnions were made flush with the carriage, but not all guns appeared this way. Many had the ends of the trunnions protruding from the sides.


It's probably a good idea to delaying the gluing of parts 18 and 21 until you are ready to attach the barrel to the carriage. I'm thinking some modification of part 18 may be necessary if you want to display the barrel in elevated position.


I'm not sure how exactly the lower ends of part 21 are supposed to be affixed to part 18. The instructions are unclear, but I did the best I could based on limited photographic references.


I added the rivet holding the reinforcing ring together to my model, but it does not seem to be present on most guns.


The most time consuming part of the build was with the cingoli. When I assembled the kit, I made the mistake of just gluing the track links to the wheels without first doing a test fit. I ended up having to shorten several of the tracks to make all the links fit.

The correct way to assemble the links requires that they be arranged loosely, instead of fitting tightly around the wheels.


Another issue is that many models of the 155 mle. 1877 (including the picture of the built model on the Wespe box) show the cingoli with 11 track shoes. I ended up fitting 11 shoes as well, but I think that there should actually be 12 track shoes. The kit supplies enough pieces for adding 12 shoes, but I'm not really sure if this is possible to do without making the cingoli overly loose.


The carriage goes together in a straightforward manner, though there is a mystery part 16 which looks like some sort of rod. The actual part 16 is a cannon shell without the fuse, so I just ignored this particular step.


The carriage has a square port on the front which I have not seen in any pictures of the actual gun, although I have to admit there are not many pictures showing the front of the gun.


I couldn't find any pictures of cannons with anything like part 23 on the carriage trail, but I attached it anyway. Leaving it off is probably okay though.


I used part 11 on my carriage since part 27 was damaged. I've also seen pictures of guns with two platforms mounted on the trail.

First Legion 1/30 155mm 1877/1914 L de Bange Cannon

For part 13, I glued them at the more forward position, but the majority of pictures seem to show these brackets in the more rearward position.


I'm not particularly happy with the model I built, but I guess it looks fine if you don't know too much about the actual cannon.


Friday, September 9, 2016

Mlle. Soixante-Quinze


The Matériel de 75mm modèle 1897, aka the French 75 was a field gun used in conflicts starting from around the time of it's introduction, and all the way into WWII.

The first 1/72 models of the gun were in resin [and metal?], but it wasn't until the HäT versions were released that models finally appeared in plastic (albeit the rubbery stuff that HäT seems to prefer nowadays).

The two HäT sets include French and American guns with caissons, and differ only in the color of the plastic and the nationality of the crew.


When assembled, the abattage (wheel anchors) are fixed in the travel position, but few will probably notice this detail. The gun shield also seems to be at more of an angle than it should be.


The first injection plastic kit of this gun was from MAC, but it is pretty rough for an injection kit.


The model includes pneumatic wheels and a German crew, neither of which I have any use for.

Clean-up of the pieces and carving out the barrel rollers from the solid piece of plastic at the end of the barrel was made easy by the soft consistency of the plastic.

I found the assembly instructions to be somewhat vague because it relied mainly on one angle to show all the steps.

Pictures of the assembled model on the MAC website, were not very helpful, as it seems to be a different (prototype?) kit (different tow ring, different wheels, fewer/missing parts), and it had the gun shield attached the wrong way.

I was trying to figure out how part 7 was positioned, since the instructions only show it viewed from the rear of the model.


In fact, the only gun I was able to find with this feature (some sort of canvas bag) was from a display in the National Museum of the Marine Corps, so I'd suggest not attaching the part at all in most cases.

The body of the gun carriage is made of a nice firm resin. Holes need to be drilled into it for the metal axle rod and hand wheels. Some plastic pieces are also included for this part, but are not used in the build.

There should be a v-shaped notch here...

The front of the carriage forces the barrel to be in an elevated position. Some of the resin needs to be removed if the model is to be displayed with the barrel in a horizontal or depressed position.

No real location is indicated for the seats either (I may have attached them too far back?).


The metal axle needs to be clipped so that it protrudes by 7mm on each side, and a bit of putty is needed to fill in all the imperfections in the trail.

A really nice feature of this kit is that the abattage looks like it can be assembled in either raised or lowered configurations (I'm going for the later). A shield for the sight will also need to be scratchbuilt.


The most recent injection kit of this gun comes from First to Fight, and is identified as a "75mm wz. 1897 Schneider". From all appearances though, it is the Canon de 75mm Mle 1897.

The majority of sources I've looked at attribute manufacture of these guns to Atelier de Puteaux rather than Schneider. In addition, many sources attributing the guns to Schneider simultaneously claim that manufacture occurred at Atelier de Bourges, which was another state run arsenal.


It has a lot of very delicate parts, and care needs to be taken when cleaning them up. The abattage looks as if it is supposed to be built in the travel position, but I think it would be easy enough to convert it to the anchored position.

The model itself, is a lot smaller than either the HäT or MAC guns. If the two other kits are accurate in size, the First to Fight model has dimensions that range anywhere from 1/76 all the way down to 1/87.

I was so disappointed in the disparity in size, that I did not bother completing my build.

For the following comparison shots, the HäT parts are blue, MAC are tan, and FTF are green.


According to the stats given at Wikipedia,
the length should be 37.3mm in 1/72 scale.

The carriage and trail of the FTF kit is also a lot shorter (by about 8mm) and narrower than that of the other kits.


The trail is assembled from two halves, and will need a lot of putty to hide the seam, or it will give the appearance of having a split trail.


Friday, July 22, 2016

Stalin's Sledgehammer


Another subject that has not been produced by plastic model companies in 1/72 scale is the 203 mm howitzer M1931 (B-4). A resin version of the howitzer was produced at one time by AER, but the kit looks like it would be a bear to prepare and assemble.

Once again though, Altaya comes to the rescue with a model of this sadly neglected subject.


The barrel can elevate to to about 45°, but the limber is glued in place so it cannot be displayed in firing mode.

The same model is also sold by War Master, except with a different color scheme and some weathering.


Since both howitzers are in travel mode, I've pre-ordered a couple of Trumpeter Komintern Artillery Tractors to tow them (maybe Trumpeter will make a 1/72 version of the howizter as well).


The following images are some interesting photos of the howitzer that I found on the web.