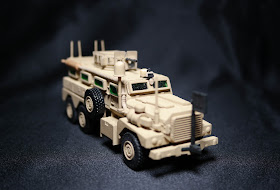
This is the continuation of my 4D MRAP build from last year, which I put on the back burner for various reasons.
I painted the edges and inside facing surfaces of the windows with Tamiya Clear Green so that the paint wouldn't be scratched when I fitted the windows into position. The fit is really tight after painting, so no glue is needed for the windows. There is a large sinkhole on the IED jamming antenna that needs to be filled in.
I painted the interior of the vehicle, and added some dividers behind the crew compartment even though it will never be seen again after I close up the hull. The four large locating pins on the rear fenders were cut off because they are visible from the side (in the gap between the hull storage boxes and the fenders).
The dividers were created as an experiment on using tulle fabric as mesh. The tulle was attached to a wire frame with CA glue and the loose ends of the fabric were smoothed off with a soldering iron.
I tried using a lighter for my first attempt, but the tulle burst into flames, so be warned. The posts for the dividers are ~13mm high, but I'm not sure how far from the roof they are because the front doors were already glued shut.
Some plastic card (4mm x 34mm) was used to cover the bottom of the boxes in order to block visibility into the cabin when viewing the model from a low angle.
I cut out some windows in the turret to install clear panes, but found it was too difficult to get the correct dimensions with clear acetate. This stalled my build until last week, when I bought some clear UV curing resin to experiment with.
I taped the inside of the windows to seal the holes, then applied the resin. The nozzle is a bit too wide, so I'll probably use a gluing tip when applying the resin in the future. Still, the resin was not overly difficult to dispense since it flows well despite having a slight viscosity.
I ended up with some air pockets on the edges of the taped side, but these holes were filled in afterwards by adding a little more resin and allowing it to harden under the sun.
The resin hardens in about 5 to 10 minutes under the North County sun, but can take up to twice as long in the late afternoon.
The tape left residue on the resin, which I cleaned off with some UHU Tac. However, the surface was still cloudy looking afterwards. Going over the surfaces with a thin layer of UV resin or using some Future acrylic floor wax clears them right up though.
I also had issues with some small air bubbles, but I still think the windows turned out pretty well.
One major issue with the model is the positioning of the spare tires. If installed as directed, they protrude more than 5mm out from the sides of the vehicle.
The positions of the tires on the actual MRAP is much closer to the body.
To solve the issue, it is necessary to cut away the middle of the tires before mounting them in place.
I also cut away the locator pin on the mount, then glued the tires in place, using the lower mounting bracket as a positioning guide.
To save the effort of doing all this, you can probably just leave the tire brackets off entirely, since I don't actually see a lot of vehicles that carry the spare tires.
I was going to add some wiring to the IED jamming antenna and the Rhino Anti IED Device, but decided not to since I don't see even 1/35 modelers going to that extent.
I scratch built a searchlight which I will embed in a clear resin dome, but since I don't have any materials for mold making right now, I'll have to wait to finish the model. Hopefully it won't take another year to get around to it.
In any event, here are some pictures of the near complete model at this point in time.
I think that the model is pretty decent. It has more parts than your typical quick build, but still retains many quick build features. It is also a great starting point for creating all the different variants of the vehicle, including the British Mastiff.


Awesome! I'm on the same model and it looks so nice! One question...How do you achieve to cut the turret windows? Is there any tool that makes it easy than a sharp knife?
ReplyDeleteWhat I did for the windows was to drill out as much of the plastic as possible, then go in afterwards with a knife to form the corners. After that, I went in with a square cross-section needle file to make everything flush.
ReplyDeleteIt's probably a good idea to use a sharpie to draw out where you want your window frames so you know when to stop cutting/filing. I didn't do this and ended up with a little variation in the windows that I wasn't 100% happy with.
Thank you for the advice my friend! I must try it, with a lot of sharp and a lot of patience it should be all right. Thanks again and greetings from Mexico!
Delete